Inspiring Designs

When living in town it’s not always feasible to have a lawn — an outdoor space at ground level that may be used for jogging round, grilling, or simply enjoying the weather. Small lots and vertical living things to roof space for a replacement for a lawn. And one way of uniting this roof space in a home is to create a rooftop addition. Listed below are a couple jobs that prop themselves up on the roof for a assortment of factors.

Fougeron Architecture FAIA

The Tehama Grasshopper designed by Fougeron Architecture is a project I’ve featured on more than 1 event. Relative to other endeavors on Houzz, it’s unique for being a renovation of a warehouse and a startling modern inside that belies the fairly dull exterior. The rooftop addition in San Francisco is a one-story glass piece that’s marked by a window that bows out on one side.

Fougeron Architecture FAIA

From across the street, it’s apparent how the rooftop piece is a new element in the northwestern building. The glass enclosure isn’t totally alien — it is about the size of a few of those windows but the articulation of this framing and glass allow it to be even more open compared to current windows.

Fougeron Architecture FAIA

From the top of the stair that leads to the penthouse, we could observe that a bedroom occupies the distance. Note how the door in the end of the photo is custom, to fit next to the angled wall that faces the rooftop deck.

Fougeron Architecture FAIA

Looking back towards the stair, it’s clear how the casting window is related to a kink from the ceiling over the stair. This kink generates another window that brings more light to the bedroom.

Fougeron Architecture FAIA

Now appearing along the stair, perpendicular to the previous photo, it’s apparent that usable rooftop distance is located on the opposite side of the addition. Therefore the residents may enjoy the outdoor space at different times of the day by following the sun across the roof.

Wanda Ely Architect Inc..

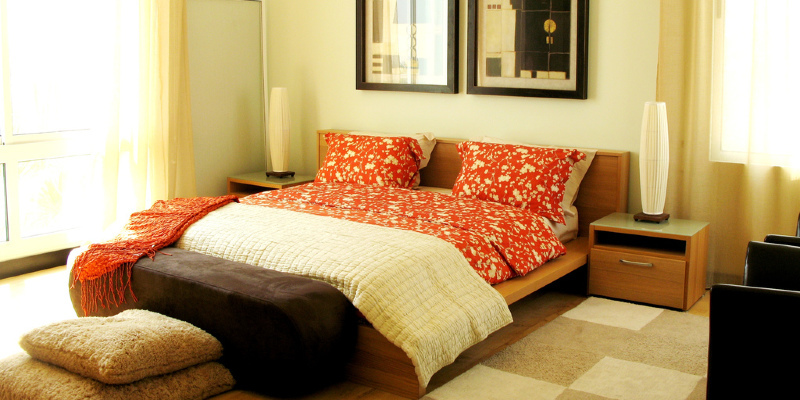
Heading to Canada and Toronto, this third-floor master bedroom and bath addition designed by Wanda Ely Architect is perched upon an existing building a whole lot more residential in character than the previous example. It is clear from this view that the addition is approximately 2/3 enclosed and 1/3 roof deck.

Wanda Ely Architect Inc..

A view from another angle indicates that the glass doors and windows between inside and outside and the wood fence in the foreground; the former connects inside and outside, while the latter gives solitude.

Wanda Ely Architect Inc..

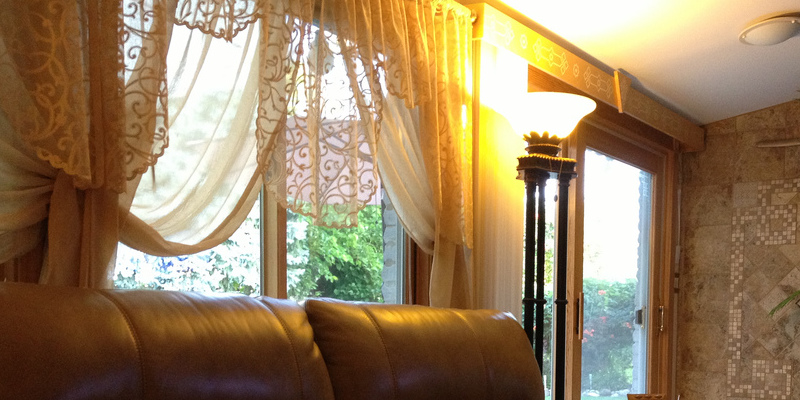
From within the addition, it’s apparent that the roof deck is a romantic extension of the distance indoors.

Wanda Ely Architect Inc..

Seen from outside, yes, the deck is little, but any bit of outdoor space is welcome from town. The sliding glass doors are also a fantastic way of uniting indoors and outside, bringing a bit of the outdoors into the home.

William Duff Architects, Inc..

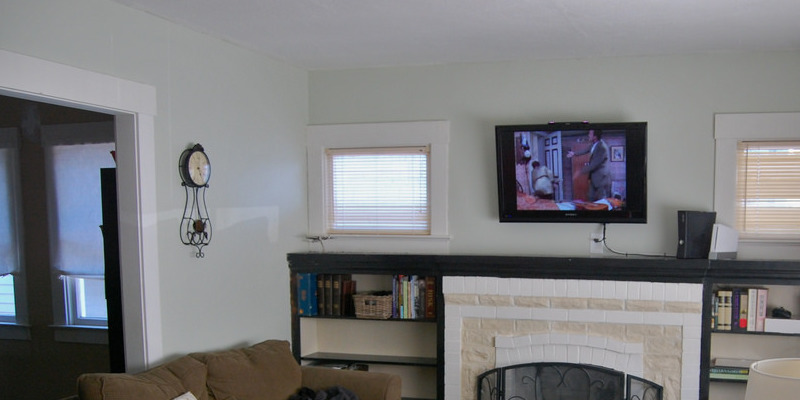
Like the last example, this rooftop addition atop a three-story condo in San Francisco unites indoors and outside through an operable wall. Designed by William Duff Architects, the master bedroom suite takes advantage of views over surrounding buildings.

William Duff Architects, Inc..

From the top of the stair, the custom cabinetry on one side of this large space is evident. Note how the clerestory windows are echoed in the recessed areas over the doors, used for locating picture frames.

William Duff Architects, Inc..

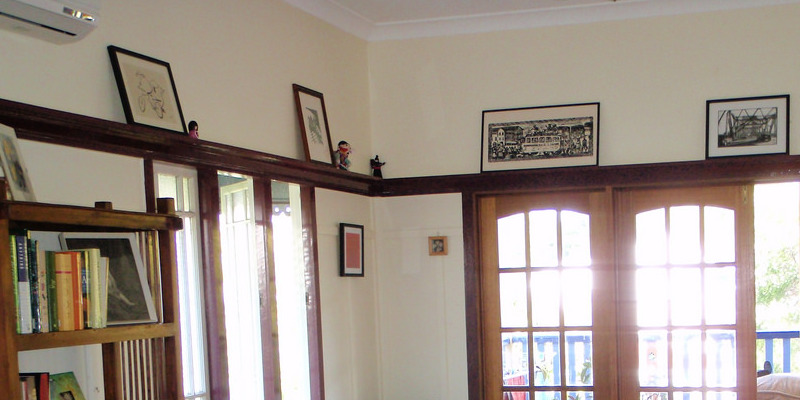
From among the doorways under the picture frames, the view towards the operable wall makes it clear that the rhythm of this wall and clerestories extends outside to the guardrail and also figurines. The rooftop deck beckons.

More: Lower-Cost, Low-Tech Modern Design
Regional Modern Home Design

See related

Wow Factor: Statement Pieces to Your House

Jazz up your home with a daring element that speaks volumes of your decorating design. Case in point: the announcement piece. What is a statement piece, you ask? When you see something which makes you stop in your tracks for a second or third look, you have got yourself a statement piece. Perhaps it grabbed your attention with its shocking colour or creative design; either way, your jaw dropped out of the impression that it made.

Whenever it is not easy implementing a statement piece, be aware that it’s the power to set the tone for the type of your dwelling. If it comes to home décor, a piece that makes you excited and talks about your style and vision is what home decorating is all about. This ideabook will explain to you how to do it.

More: Design Strategies for Art Lovers

KuDa Photography

If you’re after an original wall treatment, opt for solid wall panelling that bursts with colorful flair. This yellowish panel is used on one part of this wall to make a focal point and in the exact same time, framework the beautiful art set next to it. The colour is repeated in the seats to tie the whole look together.

COLECCION ALEXANDRA

This stunning and crimson credenza stands in stark contrast to the black and white décor. With its bold shape and colour, this piece provides a kind of charm and elegance that’s truly stirring.

Elad Gonen

This outdoor lounger is the funniest dialog piece. It is an element that echoes nature and doesn’t interrupt the landscape, but suddenly pops because of its curvilinear layout.

Tara Seawright Interior Design

An enjoyable and leafy wallpaper creates the ideal background for floral, animal and picture prints in a room which, strangely enough, seems incredibly stylish and put together. The key to this unlikely cohesiveness comes from the continuous use of an ashy colour palette which allows shapes to combine seamlessly.

Envision living

High-gloss and glittery, these pink dining tables shout great style in this contemporary dining area. Publish a colorful table with an all-white backdrop for more play.

Envision living

By the same token, this high-backed magenta bed becomes a real attention-grabber when put in white environment.

Polly

Red may be a tricky colour to use in a dining area, but when paired with a monochromatic colour scheme and utilized in stylish dining seats, the idea makes sense.

House + House Architects

This curvy railing, maybe echoing palm tree leaves using its own form, makes a statement when the stairs oppose in form and thickness. Combining reverse shapes enhances both components and provides a daring characteristic into an area.

Winn Wittman Architecture

Even though flanked by an attractive pool, the real splash in this film comes from the stylish orange seat.

Emily Elizabeth Interior Design

When decorating with bright-hued furniture, it is important that other components, like throw pillows, take cues from the exact same shade to make fluidity. Here, the bright yellow torso matches easily thanks to this.

More: Design Strategies for Art Lovers

See related

Houzz Tour: Modern Meets Conventional in Eclectic Loft

Designer Andrew Flesher discovered that the challenge of outfitting a broad open loft space — without breaking walls, traditional rooms of any kind and 60 feet of glass windows — compelling enough to take it on. And he took a surprising approach when decorating the distance, mixing traditional furnishings with modern pieces. “I really like the combination of things so that there’s some surprise, some anxiety, some juxtaposition between substances, styles, and level of formality,” Flesher says.

His Minneapolis loft exemplifies the tension between traditional and contemporary. Highlights include white leather upholstery paired using wooden antique bits, abstract paintings mixed with classical oil portraits, and art deco light fixtures sprinkled about.

Following is a look of how he divided the ground plan into a livable space, making an elegant-yet-relaxed living room in an urban atmosphere.

A box-style bookcase in white serves as a divider, delineating the more casual seating area from the dining room. Instead of stuffing each box with publications, items are carefully positioned in each branch, making an intriguing scape which includes cable chunks, contemporary sketches and mirrors among a couple piles of stacked books. Two white leather upholstered chairs with black frames face each other, making a cozy conversation area.

Farther into the space is just another casual seating area comprising an overstuffed couch upholstered in grey linen. Two white ceramic stools flank an oversized, square wooden coffee table, making a nice contrast of light and dark. A dark brown sisal rug also helps create an awareness of a smaller room.

The shiny white flooring and bright white wall give a contemporary, clean environment where the designer has placed traditional furnishings for this particular corner office. A Dorothy Draper black desk extends nicely with a grand oil portrait framed within an abysmal gold-leaf frame. Vintage crystal sconces add a touch of art deco glamour to the grouping.

A large abstract painting by artist Harold Hollingsworth hangs contrary to a freestanding wall. Two polished nickel chrome chairs sit facing using a green fern to the left breaking up the highly clean, modern look. A classic crystal chandelier adds to the grouping’s overall elegance.

The oversized French country agency (complete with a pleasure tasseled secret ) is juxtaposed nicely against the ultra-modern and modern white Barcelona chairs and ottoman. The general contrast provides a sleek look that is made warmer from the wooden bit. “I do believe that all design, and all new design, is really a development of what has happened in the past,” Flesher has said, which is one of those reasons he showcases all of his antiques in this glass block of some room.

Among the most contemporary vignettes of this space is this little Buddha statue which rests on a white base mimicking the cylindrical form of this column. Doesn’t it feel serene? This is a stunning example of how to execute restraint.

A gentle upholstered headboard feels casual put from the elegant cherry chest of drawers and easy, oversized mirror. The easy black iron lamp is a clean choice that does not compete with the intricacy of their chest.

A genuine weathered mirror offsets the antique wooden cabinet he’d fitted for the ceramic oval sink. Fresh flowers are arranged, and a gold framed drawing using a sage green matte is wrapped over the toilet. A number of the only contemporary sconces flank the elaborate mirror, which is yet another example of the tension between traditional and contemporary.

The kitchen is modern with laminate white cabinets, chrome fixtures and white appliances. Black Scandinavian wooden chairs surround a white Saarinen table. It’s the most only white space, allowing any and all meals to be the star.

More home tours:
Eclectic and Colorful in Colorado
The Concord Green and Healthy House
Sleek San Francisco Bachelor Pad
Luxury Having a Treehouse Feel

See related

Design Dilemma: Developing Cape Cod Curb Appeal

Houzz user tgeo is looking to revamp a quintessentially Northeast-style cottage from the outside. While he is brimming with expansive ideas for producing the ultimate Cape Cod cottage, it is the details that have him asking for assistance. Click here to check out his preliminary ideas and share your own.

Houzz Design Dilemmas

“We were thinking of including a peak to the entryway — there is a bumped-out region that’s a foyer, and we’d love to keep it — and including a couple of dormers to the roof to rip things out. I’m having difficulty finding pics.

Designers: What are a few factors for tgeo? Click here to go to the Question and share your suggestions.

Houzz Design Dilemmas

If you’re more about the details that make your home, tgeo “would really like to hear some opinions on dormer dimensions, color/trim choices, windows, etc..”

Click this hyperlink to increase the discussion from the Houzz Questions section.

More: Share your own design issue

See related

The best way to Remove Asphalt Tile Adhesive From a Concrete Floor

Tiling is of interest because of its own physical toughness and its inexpensive, including resistance to grease, oil and mildew. It it takes a powerful adhesive to to keep it and that adhesive can be significantly more difficult to eliminate as opposed to asphalt tiles when the time comes to remove or change the tiling. Chemical remedies, primarily solvents, may be employed to weaken the adhesive therefore their use is unwanted, but these are usually very flammable health insurance and harmful for your health. An approach that is safer would be to chip the adhesive in the surface that is concrete.

Clear the whole ground of hurdles. Close doorways that are inner to stop dirt from entering the remaining building. Open windows and all exterior doors to provide just as much ventilation as possible. Don heavy duty work gloves.

Make sure the tile remover disconnected from your power supply and is powered down. Fit a new blade on the tile remover. The specific attachment method differs in line with the maker, but the basic procedure requires sliding a blade to the slot loosening the clamp nuts and tightening the nuts. Refer to the product guide for directions that are specific.

Don safety goggles, security shoes, ear protectors and a dust mask.

Adjust the angle as specified from the documentation of the manufacturer. Start using a reasonably shallow angle between the floor as well as the blade. The goal will be to position the blade with all the front leading edge aligned together with the root of the asphalt adhesive. It is better to begin with the angle which is too shallow than steep — a steep angle might reduce to the concrete and harm the ground.

Connect the tile remover to the powersupply. Position it with the near to the region of asphalt adhesive to be eliminated.

Switch on the tile remover and enable the blade to get as much as speed. Gently transfer the device ahead and permit the blade to start chipping in the adhesive. In the event the blade cuts perhaps not seriously enough, or also deeply, swap it off, disconnect the energy and re-adjust the blade.

Until it’s eradicated move the tile remover on the other side of the flooring, chipping a-T each section of adhesive. Stop periodically to enable the blade to great and also to sweep-up adhesive chips that are damaged.

See related

Tips on Moving Right Into a Studio Flat

Whether you’re moving from a one- or two-bedroom flat into your apartment or down-sizing, arranging a transfer to a studio offers a diverse set of problems than when getting into into a location that is bigger. The reality that the new condo is tiny does not assure you a fast and painless transition, but with proper planning, you can have before you know it, your new location set up.

Plan the The Area

Before you start selecting furniture for this, measure each wall of the condo. Draw a scale map of the the system and draft a simple floorplan for the the area. Decide where you are going to put your living area, bedroom, eating area and workshop. In order to walk across the area successfully determine just how much area you’ve for each important bit of furniture, and remember to abandon an appropriate sum of space on the floor free. Program and shop especially for the the area you’ve.

Excise Additional Possessions

Studio flats desire life styles that are minimalist, and you might need to cull your possessions, particularly in the event that you had been previously residing in a larger location. Donate or share every thing you do not use frequently. Consider just how much furniture you actually need. Like, think about whether you would certainly be be ready to promote couch and your mattress and re-place them having a day bed that is fold out. Locate a storage trunk that will double as a coffee-table. Reduce the a-Mount of things you plan to transport to your own place.

Organize the Transfer

For two times, schedule your shift if achievable. Plan to move furniture as well as abandon the relaxation of your bins for the 2nd day, and your most essential dwelling materials over on the first day. Take the day-to to arrange the the room and install self storage units that are additional in kitchen or the bathroom if essential. This way, when you deliver your bins within the subsequent day, every-thing h-AS a spot to go. While you search for for ideal cupboards and book-shelves you you may not have to trip over clutter.

Rent a Truck

Do not be fooled by the dimension of your condominium — you nonetheless cannot fit-all your things in one van. Driving forth and straight back across city with numerous loads is annoying and exhausting. When you shift your furniture instead, lease a truck from a moving-company or residence enhancement retailer, a-T least for the day. As comparatively few things are being transported by you, you need to be in a position to fit all of them into the the tiniest and cheapest truck accessible, and also the investment can help you save hours of driving.

See related

The best way to Replace a Hammock Cloth

A hammock will offer an enormous dose of summer rest. Stretched from a-frame or whether strung between two strong trees, a hammock is the ideal place for enjoying a second or a nap. The outside area of the hammock leaves it in the mercy of character and susceptible to injury from rain and sunlight. Makers are little resources found when changing a hammock cloth in fabric supply stores that can deliver a powerful attachment technique. Heavy-duty canvas, employed by painters, may be obtained at paint supply shops for the alternative hammock fabric.

Remove the outdated hammock fabric in the hammock body attachment sections at both ends of the fabric with pliers. Measure width and the length of the aged hammock fabric together with the tape measure.

Cut a hammock fabric out using the measurements of the hammock fabric that was aged plus 5″ added to 7″ and the width added to the size.

Fold one quick side of the hammock under 1/2 inch. Fold the side that is same under 3″ and pin the hem in place using the pins that are straight. Repeat on the other side of the hammock fabric. Sew the hem in place utilizing the attachment that is zig-zag on the sewing-machine. Repeat on the other end of the hammock fabric.

Fold one long side edge of the hammock fabric under 1/2 inch. Fold again 2″ and pin set up. Sew the hem in place utilizing the attachment that is zig-zag on the sewing-machine. Repeat of the hammock fabric.

Mark the hammock attachment websites in the edges that are short having a pencil, utilizing the hammock fabric that is outdated as a manual. Attach the brief edges that are grommets to the hammock in the pencil marks, utilizing the device that is grommet. Attach the hammock body to the hammock through the holes.

See related

The best way to Repair a Chipped Sink With Enamel Paint

Many houses have a porcelain sink in a bathroom or the kitchen. In case a hard, large item comes into connection with the sink the sleek area of porcelain is simple to clean and preserve but can be vulnerable to chips. When you find a a chip in your sink, it is possible to repair the region with filler. Once dry, the filler can be prepared to be painted so no harm can be viewed and is going to be as tough as the area.

Clean the area across the chip using a sponge and soapy water.

Fold the wet-dry sandpaper right into a triangular form to produce a level. So the epoxy can adhere place your finger on the stage and sand the area to scratch the surface also to eliminate any rust. Wipe away any dust using a tack cloth.

Dampen the suggestion of a fabric in de-natured alcohol and clear the area that is sanded. Allow the area to dry.

Mix the epoxy filler in accordance with the instructions. Kits usually contain a resin along with a hardener.

Apply a thin coat of epoxy filler using a little paint brush in the chip location. Alternatively, it is possible to use the wood part of a matchstick. Add extra coats that are slim although the chip is deep, but wait for every single coat to dry before adding another layer. Refer to the guidelines for the time.

Sand the epoxy filler that is dry with 220-grit sandpaper so the paint will adhere. Apply a thin coat of porcelain-enamel paint that matches the colour of your sink using a little paint-brush.

Wait for every single coat of paint to dry before applying still another coat of paint and sanding the region. Continue to a DD levels of paint until the around sink is matched by the region.

See related

The best way to Determine the Size of a Window Screen

Window screens consist of mesh created with artificial fibers like polyester or plastic, fiber glass or aluminum wire. The dimensions of the mesh refers to the amount of areas that exist inside a square-inch of the materials that is woven. Different kinds of window screens are utilized to get a selection reasons; for instance screens are employed to keep small insects like gnats out. Solar insect screens not only keep bugs out, but mirror sun and solar warmth light to from entering your residence during summer months, to to dam up to 90-percent of heat and sunlight.

Template

Cut a 1 inch-by-1 inch square from the middle of a piece of paper to make a counting template that is. Counting the amount of openings it’s per-square inch determines the mesh size. The paper-cut out will help you keep an eye on the line of openings as they are counted by you. Align the edges of the cut using wires that type vertical and horizontal lines in the mesh or the warp. Hold the paper in position on the window display with tape.

Count

The amount of small square openings created across in the top corner up to to the very best right corner. This can be the first amount of the mesh dimension known as basis or the warp of the mesh. Count the amount of small openings in a straight line in the top left corner down to the bottom-left corner. This can be the 2nd amount of the mesh dimensions, known as width or the fill of the mesh. Both of these dimensions will be the dimension of the mesh. For instance, 18 warp openings and 16 fill openings signifies the window display mesh size is 18-by-16, which can be written as “18×16” around the display packaging.

Measure

The diameter of mesh dimensions refers to the diameter or width of the wire or threads of the mesh. Use electronic calipers to calculate the diameter of threads or the wires of the window display. Set the caliper jaws within the display mesh and near a reading to be taken by them and discover the diameter of the mesh. There are wire fabric or mesh calculators obtainable on the web that you could use to seek out the wire-mesh diameter, should you not not need electronic calipers.

Screen Choice

Some window display meshes are coated or laminated using a layer of plastic, producing them mo-Re tough to inquisitive kids palms or encounters with paws pressing to them. The window display mesh that is common is 18-by-16 and produced from aluminum or fiberglass. Porch, patio or pool-side screens have a mesh dimensions of 18-by-1-4. The the tiniest sized mesh is 2-by-2-0; the mesh enables for ventilation while nonetheless retaining out bugs that are small.

See related

The best way to Choose Insulated Windows

Insulated windows would be the solution to go in the event that you would like to keep toasty and warm during winter and cool and comfortable during summer. Throughout the winter, insulated windows offer a barrier that separates cool exterior air from air that is warmer. In the summer, well-insulated windows keep air-conditioned rooms cooler as temperatures that are exterior escalate. Windows are also likely to have condensation issues in comparison with non-insulated windows. Consider characteristics connected with each item when selecting windows for the real estate home. Windows are an energy efficient and long lasting expense.

Double Panes

Opt for double-pane windows. Double-pane windows were created to to put on a layer of gas or air between both panes, offering extra insulation. In accordance with EnergyGuide.com, double-pane windows insulate about twice as well as single-pane windows.

Gas Between Panes

Choose double-pane windows with argon or krypton gas between the panes. Krypton is usually employed with -pane windows. EnergyGuide.com states that argon is useful when the the area between panes is roughly 1/2 inch. Argon is costly and insulates nearly as nicely as krypton.

U-Element Score

Select insulated windows that have a low U-factor. The U-factor measures the level of conductivity in a window, therefore the lower the U-factor the better the insulation. Different components of a window have special U-elements, therefore it is most useful to to evaluate the U-element for the entire window. Read and evaluate the Nationwide Fenstration Rating Council (NFRC)details on any new window label. Ask the salesperson for the NFRC score in the event the window does not have have a label. The ufactor in this score relates to to the whole-window.

Frame Development

Compare the building supplies employed in the window body. Based on EnergyGuide.com, a window-frame makes up about around 1 5% of vitality loss by means of a window. Non-urethane aluminum windows have large conductivity levels, creating them an inadequate selection for insulation. Fiberglass is the most tough, properly-insulated window-frame substance. Vinyl and wood window frames have related U-aspects and insulate somewhat worse than fiber glass and better than aluminum.

Window Coating

Coatings on windows that are insulated. Choose windows that have a a skinny, obvious layer of metal-oxide on every pane. These windows permit sunlight to to feed the panes but mirror infra-red radiation that is harmful.

See related